
The Know-How about Clay Knobs
Last Friday, I did a guest post over at Primitive and Proper about my DIY Clay Knobs. If you've never been to Cassie's blog--you should visit! She is not only the sweetest thing, but has a lot of wonderful ideas and is a constant source of furniture inspiration!
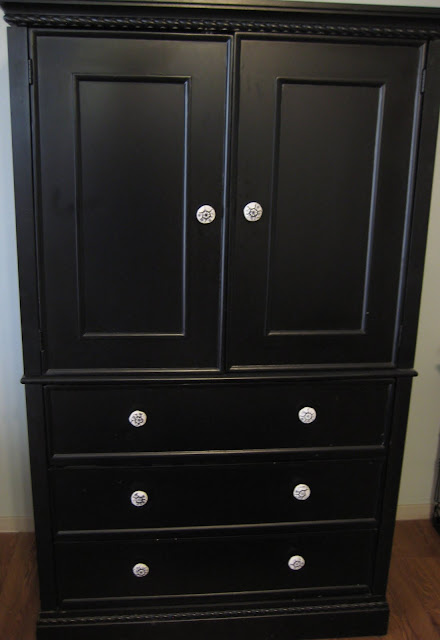
I wanted some knobs for this beast:

I bought the armoire from a lady on Craigslist (who is that lady on Craigslist anyway!) and she orgininally bought it from Target. The pulls weren't too bad, but I didn't like the silver and wanted to bring in some white.
I was inspired by the various clay knobs that I've seen floating around in the blogasphere and also on Esty. I definitely saw ones I liked, but I couldn't afford to buy them at between 6-10 dollars a pop. So, I thought I'd try to make some. In the end, they cost about two dollars each (although I did have some items on hand!) and didn't take long at all to make. Actually, they were pretty easy!
What to try your hand at making some of your own?
Here's what you'll need:

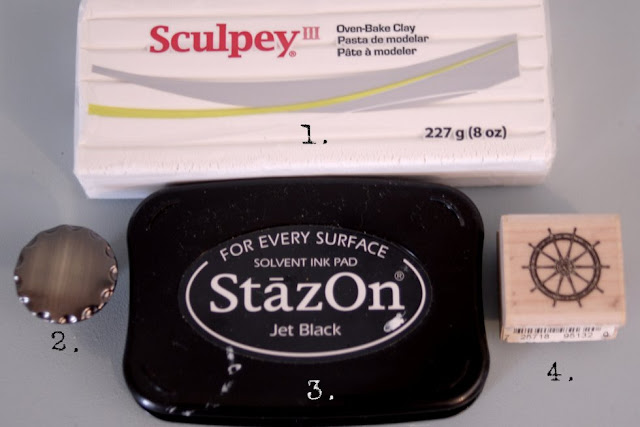
1. Molding Clay. I used Sculpey, but there are other options (you can find a bunch at most craft stores!)
2. Simple metal knob. I picked mine up for .98 cents a pop at Home Depot.
3. Ink. I used StazOn, but I think regular ink would work as well.
4. Stamp
Here's the how to:

1. Roll clay into even sized balls. Mine were about the size of a cotton ball.
2. Roll out clay into an even circle; place knob bottom side up.
3. Mold clay around the knob; work the clay until it is smooth and even.
4. It should look like this. Or better, if you are more precise than I am! I'm not the most patient (or detail-orientated) worker :)
Unfortunately, a few of next steps were zapped out of my camera by the Nikon mob. Thankfully, they aren't top secret and I can share them with you.
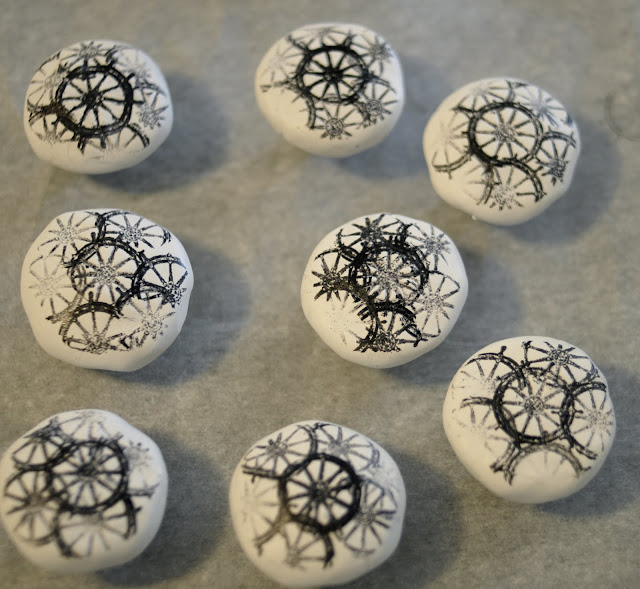
5. Stamp the top. Stamp a design. Or, be weird like me, and go stamp happy and over-stamp.
6. If you are using oven-bake clay, stick it in the oven for the time recommended. Take it out and let it cool.
Here's what mine looked like after they popped out of the oven:

7. If you are a sucker for extra-durability, you also have the option of giving them a nice coat of sealer. I did, and I think it gives them a polished look!
8. Put them on your furniture. Simple as that.
Here are a few other tips that I found helpful:
1. Make sure you like your stamp. I like how mine turned out, but I can't say I'm in love. I later realized that I should have gone with stripes! Trying to "unstamp" clay is pretty much impossible (unless you want to have smears of ink in your clay). Not cool.
2. Take the time to make everything even and circular. Unless you're like me and a little imperfection works for you. My knobs are not all completely equal is size or perfectly round and smooth. I'm okay with that. If you're not, prepare to spend some time working your clay!
3. Just try it! It is such a fun way to add your own touch to your furniture and there are so many ways to make your knobs unique. Plus, you can make fun tags with all the leftover clay!
Here they are (looking all pretty) on the cabinet:


Just for fun, here's Mac trying to get a good view. For some reason, he gets a kick out of sitting like this!

I'm linking up here:

I totally love those! I just found an armoire (sp) at a yard sale and we are refinishing it. I know I want new hardware but I was not sure what. I am showing the hubs this idea. They turned out great!
ReplyDeleteVisiting from TT&J
I love those knobs! Thank you so much for sharing the how to!! :)
ReplyDeleteI would love it if you shared this @ {nifty thrifty sunday}!
xoxo,
Vanessa
Fabulous! This is on my want-to-try-someday list.
ReplyDeleteoh my gosh! i've been trying to figure this out since i saw these knobs on Etsy but also refused to pay that outrageous price! THANK YOU! so simple, I can't believe i didn't even think of it!
ReplyDeleteWow, what a great way to save on knobs AND get exactly what you want! Thanks for linking this to Lemon Tree today!
ReplyDeleteFeatured your knobs at Lemon Tree!
ReplyDeleteThanks for the tutorial.
ReplyDeleteWhat a great idea! I need some knobs for an old shutter. My daughter will use it for hanging jewelry. This gives me some great ideas. I'm so glad you shared at Hows To's Day!
ReplyDelete